Basic Beading Stitches - Tutorials
These are some of my favorite and most-used bead weaving techniques. Look at the sample diagram below and explanation of the symbols in order to understand the following directions.
Sample Diagram
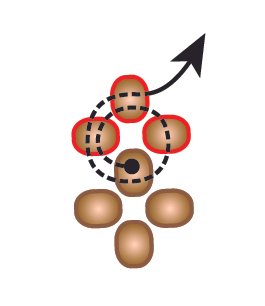
Beads already added when you start a step are shown in the diagram in color with a normal outline. Beads you need to add in the current step are shown with a red outline.
Thread paths going through beads are dashed, and thread coming out of beads is solid. Old thread paths are not shown.
The arrow represents the needle. The dot indicates the start of the thread path.
Even Count Peyote Stitch

Needle up an appropriate length of thread. Pick up a bead to use as a stop bead (if desired). Stitch through it a second time to anchor it near the end of the thread, leaving about 5" of tail thread. Pick up an even number of pattern beads.
_________________________________________________

Bring the beads down to meet up with the stop bead. Pick up a new bead, and heading back toward the stop bead, skip over the last bead added and stitch through the one before it.
_________________________________________

Pick up a bead, skip over the next bead and stitch through the one after it. Repeat until you reach the end of the pattern bead row. Take off the stop bead if desired.
___________________________________________

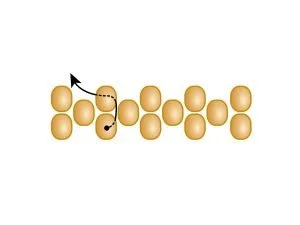
Working in the opposite direction, pick up a bead and stitch through the next "up" bead added in the previous row. Repeat until you reach the end of the row. To continue, repeat this step as many times as desired to add rows.
Odd Count Peyote Stitch

Follow Step 1 from the Even Count Peyote Stitch Tutorial above, but string on an odd count of beads. Reverse direction and pick up one bead, skip over the last bead and stitch through the next. Repeat until you reach the second to last bead in the strung row.
_________________________________________________

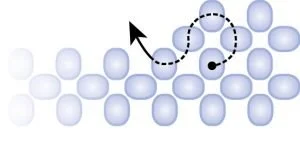
Pick up one bead and reversing direction, stitch through the the next bead in the initial row, away from the stop bead.
_________________________________________________

Remove the stop bead whenever comfortable. Stitch through the next two beads.
_________________________________________________
Reverse direction and stitch through the bead above the one from which your thread is emerging.
_________________________________________________

Stitch through the next bead toward the close end of the beadwork, then the next bead from the initial row.
_________________________________________________

Reverse direction and stitch through the adjacent bead. You have now completed an odd-count turn-around.
_________________________________________________

Stitch the next (even) row by doing simple peyote stitch. From this point on, all odd rows will require an odd-count turn-around and all even rows will not. Repeat all steps until your peyote strip is the desired length.
Tubular Peyote Stitch

Pick up an even number of beads, bring them down close to the end of your thread, and stitch through the first few beads again to form a loop.
_________________________________________________

Pick up one bead, skip the next in the loop, and stitch through the one after that.
_________________________________________________

Repeat the previous step all around the loop until you get back to the beginning.
_________________________________________________

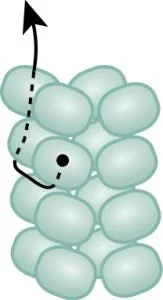
Step up by stitching through the first bead added in the round just completed. To continue, repeat the previous step and this step until your tube is the desired length.
Ladder Stitch

Pick up two sets of beads; this can be groups of two, three, four, or more beads. The number will determine the width of the laddered strip. Stitch through the first set of beads a second time and line the two sets up with each other.
_________________________________________________

Stitch through the second set of beads again.
_________________________________________________

Pick up a new set of beads the same number as the last. Stitch through the last set of beads in a circular fashion.
_________________________________________________

Stitch through the new set of beads once more. Continue by repeating the last step and this step til your strip is the desired length.
_________________________________________________

Ladder stitch can also be used to stitch two groups of previously stitched beads together by stitching around in a circular fashion between beads.
Tubular Herringbone Stitch

String up four beads per ladder. This tutorial shows the two-ladder version. Stitch through the first bead again to form a loop.
_________________________________________________

Pick up two beads and stitch through the next bead in the loop. Skip over the next two beads in the loop and stitch through the third (blue thread). Pick up two beads and stitch through the next bead in the loop. Skip the next two beads and stitch through the third (black thread). Step up through the first bead in the first pair added.
_________________________________________________

Pull the thread tight so the ladders start to form. The new pairs of beads added will be at the top of the ladders. Pinch the structure together if you have to while you work so you can visualize the ladders. Pick up a pair of beads and stitch down through the next bead in the ladder. Stitch up through the first bead in the next ladder.
_________________________________________________

Pick up two beads and stitch down through the next bead in the ladder.
_________________________________________________
Stitch up through the top two beads in the first ladder to step up. To continue, repeat the previous two steps and this step until your tube is the desired length.
Netting

Pick up an even or odd number of beads, depending on how many beads will be in each "net". This row will determine the overall width of your netting.
_________________________________________________

Pick up one "net" of beads, in this case three beads. Reversing direction, Skip over the same number of beads in the net, plus one. Stitch through the bead after that.
_________________________________________________

Pick up one "net" of beads, skip the same number of beads in the initial row and stitch through the next. Repeat until you reach the end of the initial row.
_________________________________________________

Pick up two beads plus one "net." Reversing direction, stitch through the middle bead in the previous net.
_________________________________________________

Repeat the step before last. To continue, repeat the previous step plus this step til your netting is the desired length.
Right Angle Weave

Pick up four beads and stitch through the first three beads again to form a loop. You can use a different number of beads, but it needs to be divisible by four. This version is the simplest version. This is one RAW unit.
_________________________________________________

Pick up three beads and stitch through the bead in the first unit again to form a loop. Stitch through the first two beads added again.
_________________________________________________

Repeat the previous step until your strip is the desired length. Then stitch through the next bead without picking up any new beads to step up for a second row.
_________________________________________________

Pick up three beads and stitch through the bead in the last unit again in a circular fashion. Then stitch through the first bead added again.
_________________________________________________

Pick up two beads, stitch through the aligned bead below in the first row, heading toward the previous unit.
_________________________________________________
Stitch through the bead in the previous unit, then the two beads just added. Stitch through the top bead in the next unit in the first row.
_________________________________________________

Pick up two beads and stitch through the bead in the previous unit, then the bead in the aligned unit in the first row. Stitch through the first bead just added.
_________________________________________________

Repeat the four steps until you reach the end of the row. Then stitch through the next bead in the unit just completed. To continue, repeat the four previous steps plus this step til you have the desired number of rows.
Cubic Right Angle Weave (CRAW)

Pick up four beads and stitch through all the beads again, then the first one once more to form a loop. This is the base of your first CRAW unit.
_________________________________________________

Pick up three beads and stitch through the same bead in the base again, then through the next bead in the base.
_________________________________________________

Pick up two beads and stitch down through the side bead in the previous group, the same bead in the base, then the next unit in the base.
_________________________________________________

Pick up two beads and stitch down through the side bead in the group, then the same bead in the base.
_________________________________________________

"Travel" (stitch through beads) to the other side of the unit by stitching through the next bead in the base and up through the side bead in the first set of three beads added.
_________________________________________________

Pick up one bead and stitch down through the side bead in the previous group, the same bead in the base, and the side bead in the first group of beads.
_________________________________________________

Step up by stitching through the very next bead, which is the middle bead of the first three added.
_________________________________________________

Stitch around through the four beads on the top of the unit to reinforce and close up the unit. To continue, repeat all steps but the first until you have the desired tube length.
_________________________________________________
Three Sided Prismatic Right Angle Weave (3-PRAW)

Pick up three beads and stitch through the first bead again to form a loop. If desired stitch around through all the beads again. This is the base of your first 3-PRAW unit.
_________________________________________________

Pick up three beads and stitch through the same bead in the base again, then through the next bead in the base.
_________________________________________________

Pick up two beads and stitch down through the side bead in the previous group and the same bead in the base.
_________________________________________________

"Travel" (stitch through beads) to the other side of the unit by stitching through the next bead in the base and up through the side bead in the first set of three beads added.
_________________________________________________

Pick up one bead and stitch down through the side bead in the previous group, the same bead in the base, and the side bead in the first group of beads.
_________________________________________________

Step up by stitching through the very next bead, which is the middle bead of the first three added.
_________________________________________________

Stitch around through the three beads on the top of the unit to reinforce and close up the unit. To continue, repeat all steps but the first until you have the desired tube length.
_________________________________________________